Around 2.71 billion people own a smartphone, and, it’s safe to say, we’re all guilty of having a messy contact list at some point.
Whether your phone is overflowing with business or personal numbers, there are quick and easy ways to manage contacts to make your life easier.
Not sure how? Don’t worry, we’ve got you covered. Here’s everything you need to know.
Benefits of Organizing Your Contacts
When you organize contacts, you can minimize your phone book and communicate with others easier.
Many smartphone users use Whatsapp, iMessage, and other messaging apps, but, occasionally you must make calls and navigate your personal contacts. This can be stressful if you have many duplicates or unknown contacts clogging up your phone.
Our Favorite Organization Tips
Whether you want to organize contacts iPhone or Android, applying a few tips will make storing phone numbers easier. Here are a few of our favorite hacks.
1. Merge Duplicate Contacts
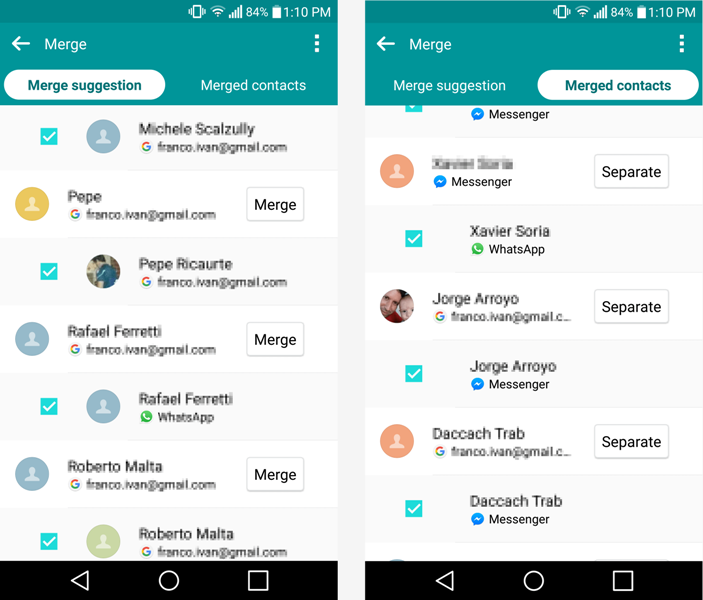
You may wonder how you’ve gotten several John Smiths on your phone when one contact card has a telephone number and the other displays an email address.
Luckily, we can merge duplicate contacts into one card. On iOS, find the first contact you have two cards for (we’ll use John Smith as an example).
Tap “Edit” on the top right of your screen, scroll down, and tap “Link Contacts…”. Select John Smith’s other contact card and tap the “Link” button on this card’s screen. Finally, tap “Done” and both contact cards will be merged.
For Android smartphones, open the Contacts app and tap “Menu” and then “Suggestions”. Next, press “Clean Up Duplicates” and the phone should automatically suggest which contact cards need to be fixed.
If you have many duplicate contact suggestions, tap “Merge All” at the top of the screen and the problem will be fixed.
2. Update Everyone’s Information
Few of us have time to manually add missing details on a contact card. Luckily, you can streamline the process and update your contact cards on your Mac or PC in the default contacts app and then upload them onto your smartphone. You can also sync iPhone contacts to Mac and edit them that way.
3. Add a Profile Photo for Every Contact
You can add photos to contact cards on your iPhone. First, select “Edit” on their card and then choose “Add Photo” either by taking one or uploading a photo from your Gallery.
Android users can do this by going to Contacts, selecting the person and pressing the “Edit“ icon. Touch the icon where the contact’s picture goes and tap “Choose Photo” from the Gallery command. Find the image then choose “Done” to finish the process.
Or you can use Facebook to automate uploading photos to your Contacts. First, go to “Settings”, choose Facebook and log in. Once you’ve signed in, tap “Update All Contacts” which gives Facebook your phone’s Contact details.
Facebook will then use this to match its users with your contacts and automatically update your phone’s contact photos.
4. Delete Contacts You Don’t Need
A fantastic way to organize your address book is by removing contacts you don’t need like old co-workers, acquaintances you’ve lost touch with, and random contacts imported from other social media channels. Removing the clutter makes it easier for you to find the few contacts you regularly need.
To do this, iPhone users must open each contact, press “Edit” and choose “Delete Contact”. And if you use Android, hold on to a contact to enter “Select Mode”. You can then choose the relevant contacts, then press “Delete” to remove them from your device.
Also, as you go through the remaining contacts, add important ones to your “Favorites” so they’re easier to find. It also means they can still message you even if you’ve selected “Do Not Disturb“. You can also organize your address book by adding contacts to different groups like Family or Work.
5. Use Nicknames Instead
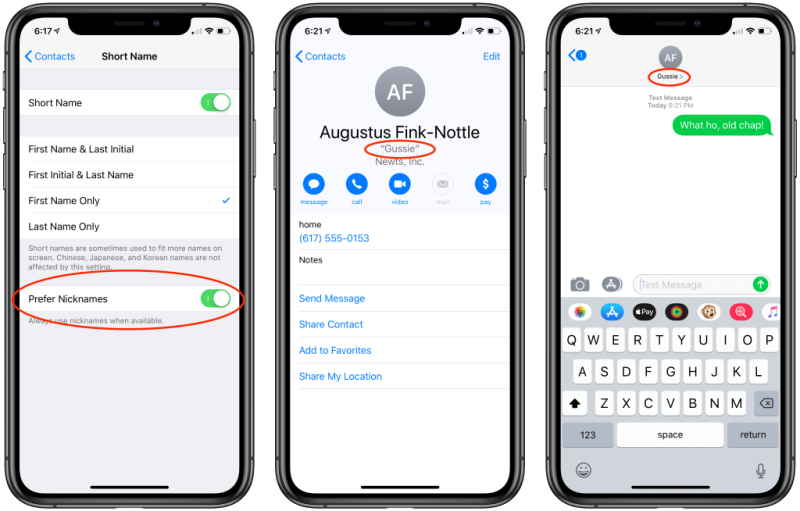
Bored of an address book filled with full names? You can now add nicknames for your contacts which is handy for relatives. It may be weird seeing your brother as “Max Smith”, but luckily iOS and Android let you use his real and nickname on the same contact card, so you can choose either to shoot off a message or a text.
On your iPhone, find “Max Smith” in your Contacts app and choose the “Edit” button. You’ll notice the Nickname field doesn’t appear so scroll down and find the “add field” button. Next, tap the “Nickname” that comes up.
Once you’re retaken to the Contact edit screen, type in your brother’s nickname and press “Done”. Now, you can bring your brother’s information in Messages or Mail by entering their new nickname. Android users must press “People/Contacts”, click “Edit”, tap “Add another field” and type in the nickname.
6. Organize By First or Last Name
If you want to follow the traditional route, manage your contacts by first or last name. Android users can do this by going to “Settings”, and under “Display”, you’ll see the “Sort by” option. Click on it, and a window will pop up letting you choose whether to organize by first or last name.
iPhone users can do this by going to Contact, and select “Sort Order”. Then choose “Last, First” or “First, Last”.
That’s How to Manage Contacts on Your Smartphone
Whether you’ve got an iPhone or Android smartphone, there are easy techniques so you can manage contacts. Start by combing through your address book to see which contacts are most frequently used and remove ones you never use.
You can add nicknames, profile pictures, and merge duplicate contacts so it’s easier for you to reach your loved ones and save your phone’s memory. Happy cleaning!
Did you find this article helpful? If so, check out our posts on everything from fashion to tattoos and more.